- Continue Shopping
- Your Cart is Empty
DIY Ramen Noodles

What You'll Need
Equipment
- measuring cups and spoons
- mixing bowl
- clean, smooth surface for kneading and resting dough
- pasta machine with angel hair attachment
- plastic wrap or Bees Wrap, bought or homemade
- wooden spoon
- a 6' or longer piece of thin rope such as nylon clothesline, or parachute cord. Synthetic rope tends to be best for this
- large stock pot
- colander large le parfait jar if storing
Ingredients
- 2 cups all-purpose flour, plus more for dusting
- 1 teaspoon kansui, OR 2 teaspoons baked baking soda, aka sodium carbonate; see instructions below
- 1/2 cup water, plus more if needed
Ramen noodles are made in China and Japan with an alkaline mineral water, which is sold as kansuri in specialty Asian markets. Since we live in the woods and are far from such a market, I kept digging. Kansui, or lye-water, was made before the days of industrial food production by filtering water through burnt hardwood ash or gathered from wells that had a highly alkaline water. The high pH of both of these concoctions is what makes the ramen noodle so slurpingly chewy and delicious. As it turns out, kansui is essentially (mostly) sodium carbonate, similar to but crucially different from the sodium bicarbonate that makes up our cheerful, familiar yellow box of baking soda. And, through a process of oven alchemy, familiar baking soda can be transformed into sodium carbonate, which is a much more alkaline salt than its parent. This “baked baking soda” is the secret ingredient that creates the bouncy, springy texture of ramen noodles.
To turn baking soda into sodium carbonate, you’ll need to bake it in an oven for about 2 hours. While a single batch of ramen noodles only requires 2 teaspoons of baked baking soda to make, you may want to make more and store it in a marked container for future use.
To make the sodium carbonate, spread the desired amount of baking soda on a baking sheet, and place it in the oven at 200 degrees for 2 hours. As it cooks, the bonds that form the bicarbonate will be broken, and Co2 and H20 will evaporate, leaving behind the pure sodium carbonate. This will have a lighter, finer consistency than baking soda; be aware that it is so fine that it can become airborne easily. It is also much more alkaline than unbaked baking soda, so it can irritate sensitive skin in its dry form.
Serves 4-6 people.

Directions
Make an alkaline water solution. Dissolve the sodium carbonate into 1/2 cup of warm water, stirring until the powder has dissolved and the water becomes cloudy. Measure 2 cups of flour into a mixing bowl, and make a well in the center.
Pour the alkaline water into the flour, and notice as the color begins to become the characteristic yellow hue of ramen noodles as the alkaline water reacts with the flour.
 Using a wooden spoon, stir the mixture until the ingredients are well combined and the dough comes together into a single ball. If the mixture seems too dry, add a bit more water (not alkaline water, just drinking water) a teaspoon or two at a time, until a cohesive consistency is reached.
 Allow the dough to rest for half an hour at room temperature. Cover or wrap it so that it does not dry out.
 Knead the dough by hand for 3-5 minutes on a lightly floured surface.
 Divide the dough into 2 or 3 pieces.
  Cover the remaining portion of the dough again, and form the piece you are working with into a flattened patty shape.
 Roll the dough through the pasta machine at the widest setting. If the first pass through leaves the dough rough and ragged, simply fold the dough in half and run it through again, as many times as needed, until the dough is smooth and uniform.
  Repeat on the next lowest setting, but do not fold the dough over in half again. Continue reducing the thickness of the rollers so the dough gradually gets thinner and thinner. If the dough begins to stick, dust it lightly with flour.
 When the dough has reached the desired thickness, about a sixteenth of an inch, cut it into manageable lengths and spread it over a work surface to dry for 10-15 minutes.
Pass the rectangles of dough through the small “angel-hair” cutter on a pasta maker. If the dough sticks, or does not cut well, dust it with flour, or let it sit a while longer to dry out a bit. If the noodles will be used right away, simmer them in boiling water for 1 minute, then rinse them in cold water before adding them to the broth.
To dry the noodles, hang a thin rope such as nylon clothesline, or parachute cord, in a convenient place in the kitchen. Choose a rope that does not have fibers that can stick to the noodles; synthetic rope tends to be best for this, while cotton, hemp, and burlap tend to shed tiny strings onto the noodle.
Catch each bundle of noodles as it comes out of the cutter, and hand it on the noodle-line.
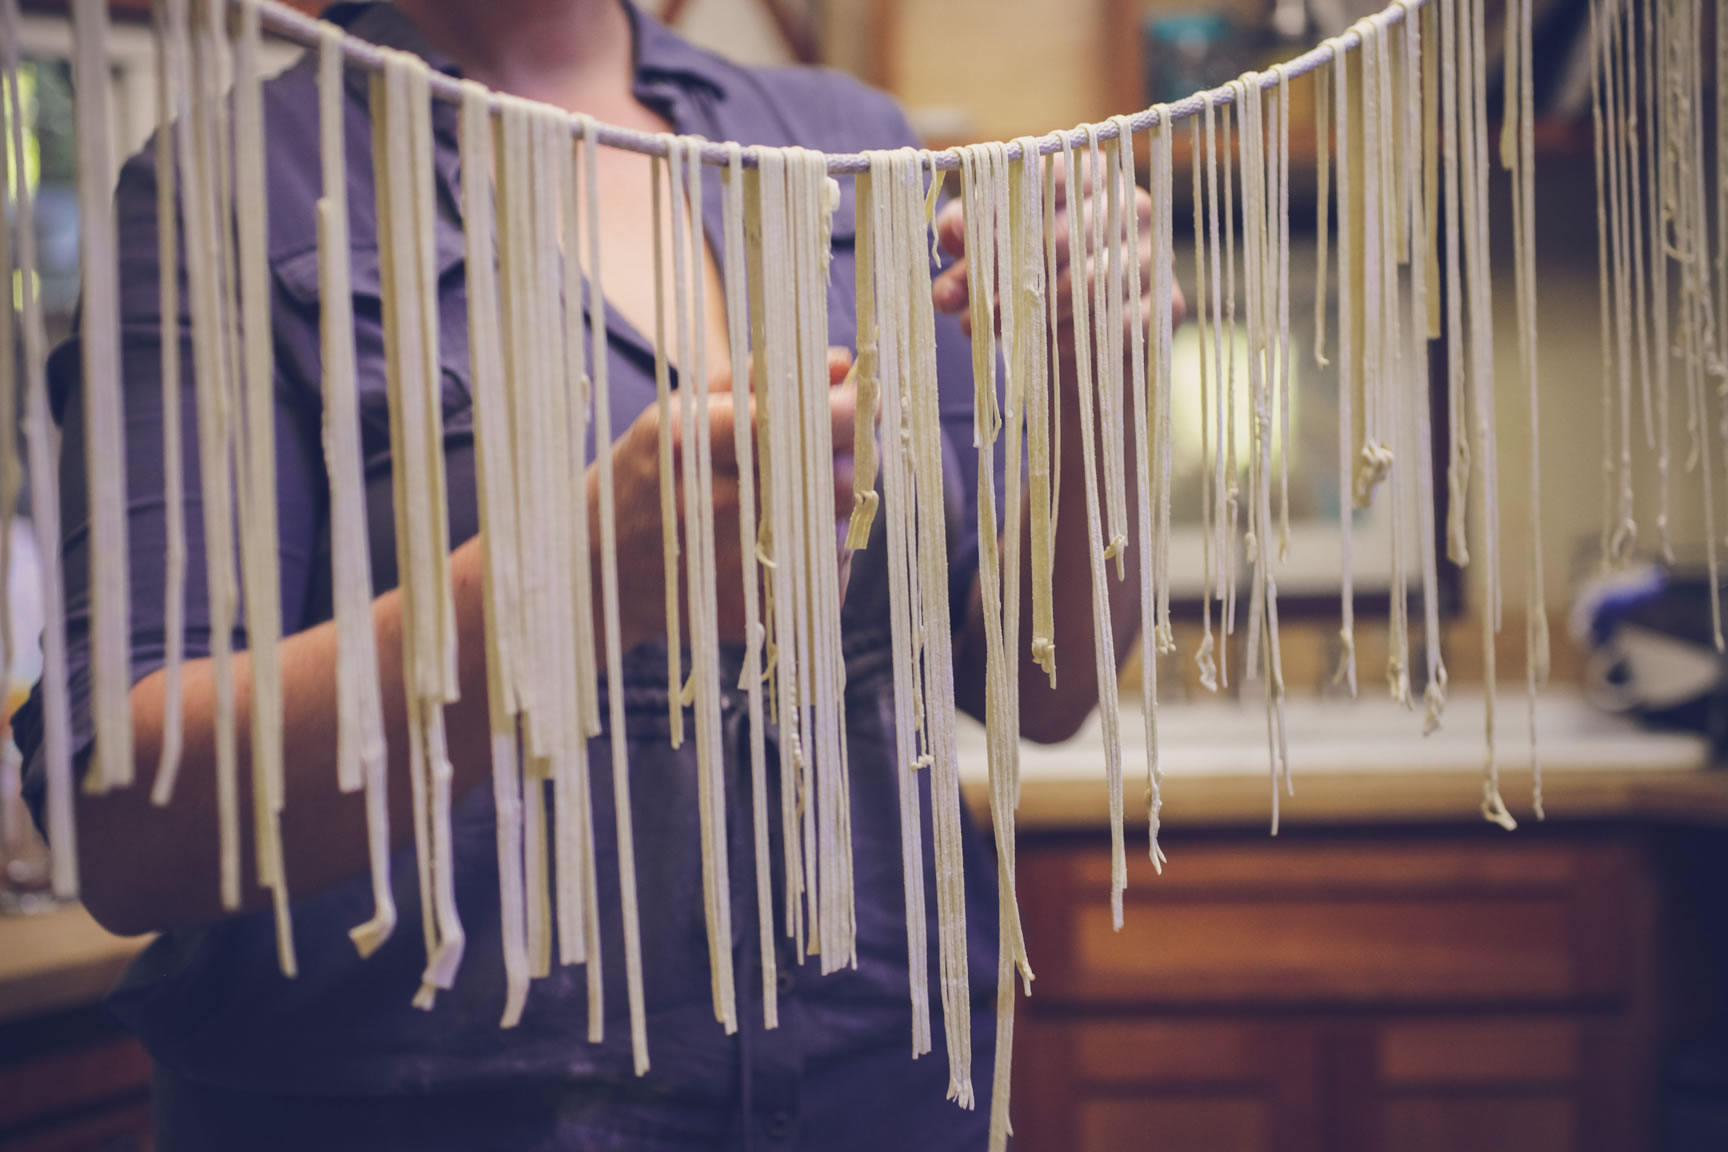
Spread the noodles out so that there is room for them. Allow the noodles to hang until dry, 6 hours-overnight.
When fully dry, they can be stored in an airtight glass container for several weeks.
Over to You
It’s part of our mission here at Mountain Feed to help you make delicious, sustainable, homemade food more often. Stop by and say hello on Facebook, Twitter, Instagram or Pinterest. Or, as always, you can do it the old-fashioned way and come by the store to speak with one of our in-house experts.