- Continue Shopping
- Your Cart is Empty
How to Make Hard Cider
What You'll Need
Equipment
- One packet Champagne yeast or Cider yeast
- One 1oz. packet pectic enzyme (optional)
- One 1oz. packet Campden tablets
- One 2oz. packet powdered sanitizer
- One 1 gallon glass jug with cap
- One airlock
- One musting cap with airlock hole
- One stick-on thermometer
- One 1oz. packet organic corn sugar
- One bottle filler
- Three feet plastic tubing
- One Auto-Siphon racking cane
- One bottle capper tool
- Ten bottle caps
- Recipe and instructions
You'll Also Need
- 1 gallon store bought apple juice or freshly pressed apple juice
- Organic sugar (optional)
- Hydrometer and hydrometer jar
- A funnel
- A stainless steel bowl
- A hard cider making book or home brew book
- 10 bottles for your finished cider (start saving your empties!)
Hard Cider Directions for 1 Gallon
1) Prepare & Sanitize Your Equipment
Wash and sanitize your equipment prior to beginning. Follow instructions on your pack of PBW sanitizer on mixing and get a good hard cider book to guide you on sanitation.
Mix a small batch of PBW sanitizer in a stainless steel bowl following the instructions on your PBW packet. YOU DO NOT NEED TO USE THE ENTIRE PACKET OF PBW FOR THESE FIRST STEPS. You should only need to mix about a quart of sanitizer for the first 2 steps of this process. Save some sanitizer for later steps and for future batches of cider!
What is the difference between washing and sanitizing?
- Washing: Scrubbing your equipment with soap and warm water.
- Sanitizing: Soaking your equipment in your PBW solution or swishing the sanitizer solution around inside your bottles or jug. Do your homework - READ YOUR CIDER BOOK FOR SANITATION GUIDELINES FIRST!
Sanitation is of vital importance during all steps of the brewing process.
Even brief contact with the air can result in contamination from dust and wild yeasts. For that reason it is especially important to do all bottling and racking procedures in as clean an environment as possible.

A Clean Working Area is Essential
Make sure the area you are working in is clean, and try to limit air flow as much as possible; no open windows nearby and no fan, no sweeping or vacuuming in the same room as your brew during any part of the process.

Sanitize All of Your Equipment, Always
Sanitize all of your equipment before you need to use it.
For the racking and bottling procedures, this will mean swishing a sanitizing solution, such as Star-San or Iodophor, around inside the carboy, as well as running the same solution through the siphon hose.

2) Prepare for Fermentation
Let the juice come to room temperature. Pour 1 gallon of apple juice into your glass jug. If you have store bought apple juice already in a 1 gallon glass jug you can leave it in that container. If you have freshly pressed your apple juice or unfiltered store bought juice and you prefer a clear cider, add 1 tsp. of pectic enzyme at this time. Save the rest of your pectic enzyme for future batches of cider.
 3) Further & Ongoing Sanitation
At this point proper sanitation is very important. Bacteria can begin to grow in 3 hours. Add a crushed Campden tablet to your juice to kill any bacteria that exist at this time. You will continue to sanitize all of your equipment with your powdered sanitizer solution anytime it comes into contact with the cider from this point on. Campden tablets should not be used to sanitize equipment.
4) Adding Yeast
 Add ¼ teaspoon of Champagne yeast into your juice. Allow the yeast to float on the top of the juice for 2-3 minutes to rehydrate it. Then gently swirl the bottle to mix.
5) Cap the Jug with the Cork and Airlock
 Sanitize your cork and airlock (pictured previously). Fill the airlock with sanitizer solution to the fill line. Place the airlock in the musting cap and then place the cap on the jug.
6) Fermentation
 Stick the thermometer onto the side of your jug.
Store your jug in a warm place. Ferment at 55 °F-74 °F for 30 days. In the first 5-7 days your cider will become very foamy and your airlock will be bubbling actively.
7) Choosing Your Bottles
 After 30 days your cider should be barely bubbling. You can check this by watching your airlock for 5 minutes. If you see 1 bubble or less in 5 minutes your cider is ready to bottle. You will want to determine what type of bottles you want to use and if you want your cider carbonated or not.
If you are using our kit, bottle caps and a capper are included. These work perfectly on beer bottles so you can recycle!
Swing top bottles are also an excellent choice for bottling cider. They look beautiful but are more costly than re-used beer bottles so if you plan on giving your cider away they might not be a good choice. Just make sure your bottles are meant for carbonated beverages if you plan on carbonating your cider.
8) Add the Corn Sugar Solution for Carbonation (optional)
 If you don’t plan on carbonating your cider, skip this step. If you want carbonated cider you will need to add a corn sugar solution to your cider before bottling.
Boil your corn sugar in ½ cup of water for 5 minutes in a small saucepan to dissolve. Cool the sugar solution to 70 °F and poor into your 1 gallon jug of cider using your funnel.
Gently swirl to mix well. Try not to disturb the sediment in the jar too much.
10) Sanitize Your Bottles & Equipment
 Sanitize 10 bottles and caps, your AutoSiphon, Bottle filler and plastic tubing and a funnel.
Sanitize During Bottling
Rinse all bottles in sanitizer, and soak the caps in a bowl of sanitizer before applying them - unless you're using swing top bottles of course. Cap each bottle as soon as it is filled.

The Cleaner Your Process, the Better Your Brew
Remember, always consult a recipe and a trustworthy home brewing book when brewing anything at home, and always make sure to sanitize well and often!
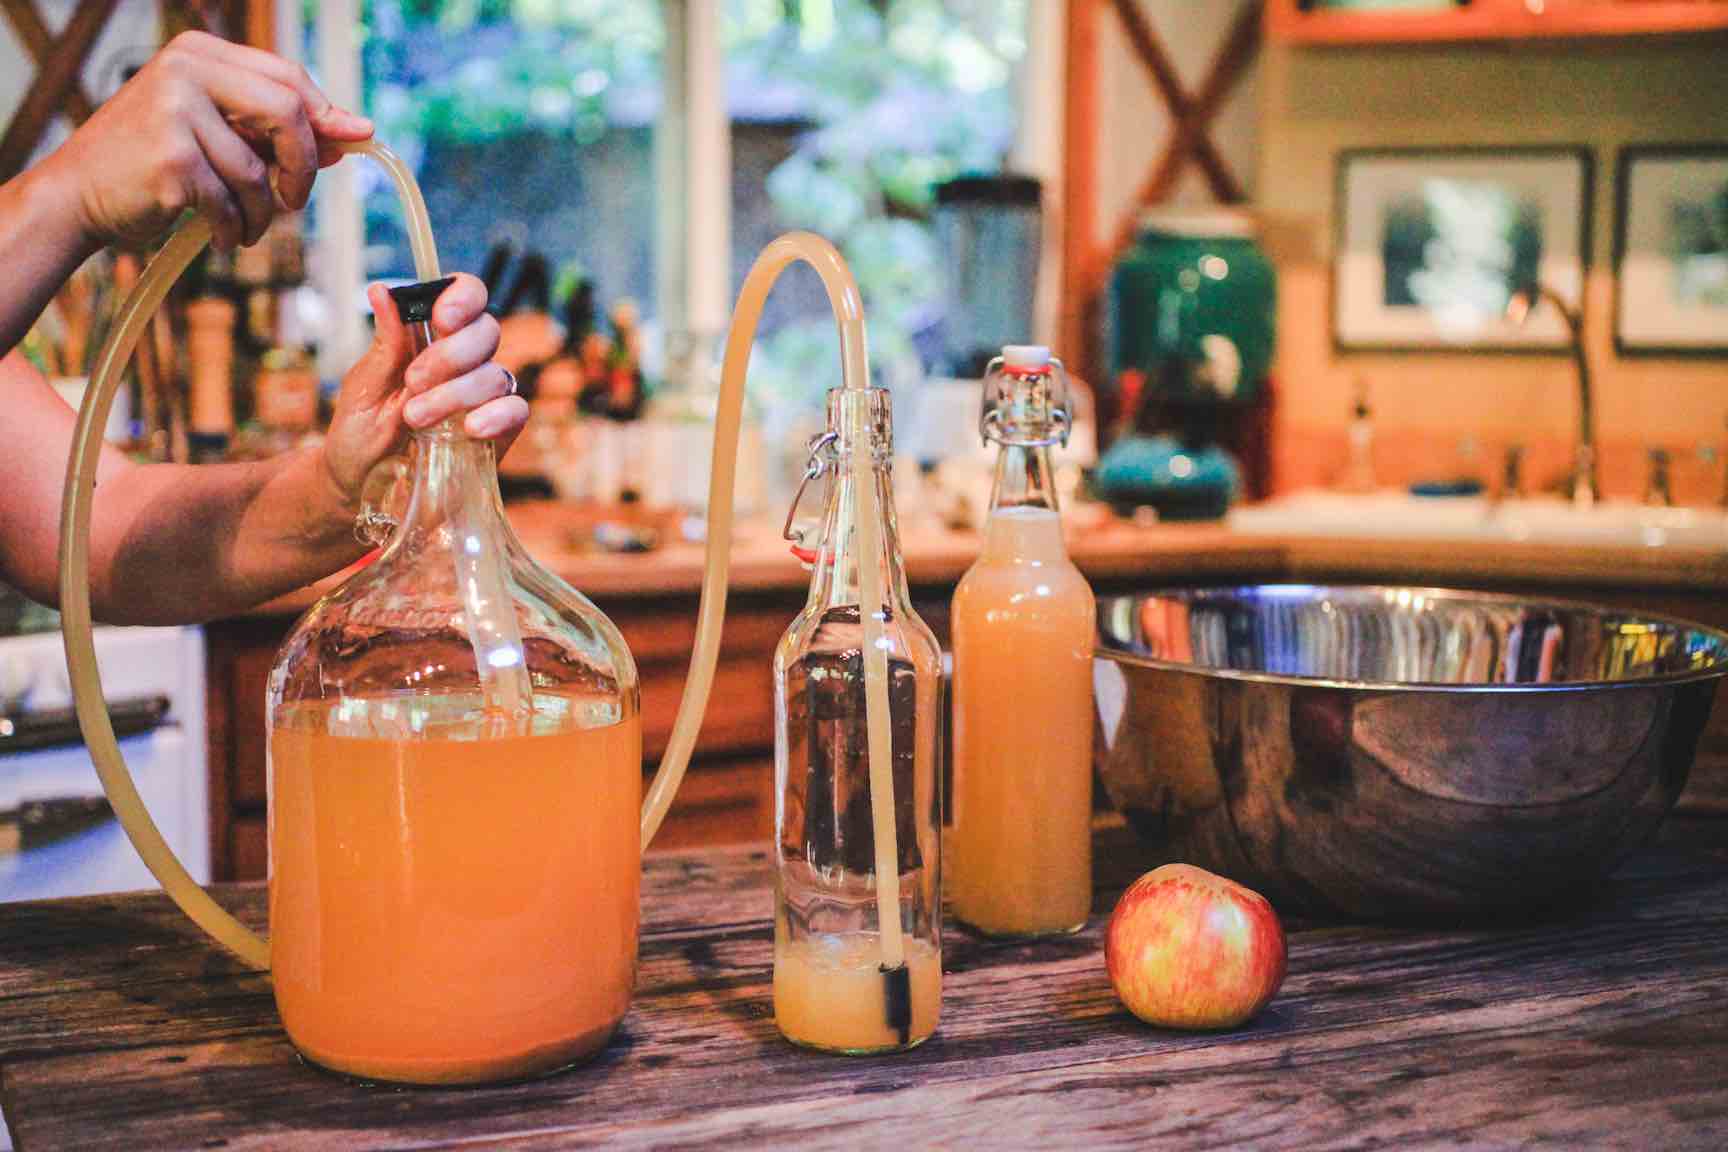
11) Fill Your Bottles Using the Auto-Siphon System
 Attach one end of your plastic tubing to the AutoSiphon and one end to your Bottle Filler. Place the tip of the bottle filler inside your first bottle. Place the rubber end of the AutoSiphon into the 1-gallon jug of finished cider. If the sediment on the bottom of your jug is higher than the rubber at the bottom of the AutoSiphon, hold the bottom of the siphon in the clear portion of the cider to start as illustrated on the AutoSiphon instructions. Follow instructions on the AutoSiphon and Bottle Filler to fill bottles. (It is good to practice this with water first before trying with your brew to avoid wasted cider).
12) Cap Your Bottles
 Cap immediately to avoid contamination. Follow instructions on the bottle capper.
Store and Enjoy
Bottle, cap, label and store your cider in a cool, dark place for at least 4 weeks before drinking. Hard cider is best when aged for 3-6 months, especially when carbonated. Make sure you note that you have added sulfites to your cider (Campden tablets). Some folks can have an allergy to sulfites.
Refrigerate before drinking.
A note on using a hydrometer: If this is your first try at hard cider you might want to skip the process of using a hydrometer. You use a hydrometer to measure the specific gravity of your juice and determine the alcohol content of your finished cider.
Over to You
It’s part of our mission here at Mountain Feed to help you make delicious, sustainable, homemade food more often. Stop by and say hello on Facebook, Twitter, Instagram or Pinterest. Or, as always, you can do it the old fashioned way and come by the store to speak with one of our in-house experts.
Keeping a great journal leads to delicious results (and better brews!). Get inspired by new recipes, expert articles and homemade food adventures in our Monthly Journal.